
You can extend the life of a water heater significantly by taking proper care of it. If you give your water heater a good yearly service, it will last you eight to twelve years. When it comes to actual heater installation, you’ll normally need to call in a professional like summersphc.com – but for routine maintenance, you can normally do it yourself. All you need is a sturdy bucket and a couple of screwdrivers.
First Things First
The very first thing you need to do before you start doing anything to your system is to turn off the electricity and/or gas supply. For electric systems, locate the circuit breaker for the water heater in your breaker box (service panel) inside the home, and switch it off. For gas systems, locate the pilot knob on the water heater, normally on the gas valve or thermostat, and switch it off.
Step 1: Mini-Flush
Sediment that builds up on the bottom of the tank causes rust and corrosion. By removing the sediment, you not only help prevent this, but you also enable your water heater to perform more efficiently and more cost-effectively. If you want to flush the water tank completely, that requires shutting down the water heater. If you want to keep the heater running and also save a lot of time, you can do a mini-flush. To do this:
- Get your bucket and place it under the drain valve (somewhere near the bottom of the water heater tank).
- Get your screwdriver, and open the drain valve (counterclockwise). In some cases, you won’t even need the screwdriver, since some water heater models use handles rather than screws to secure their drain valves.
- Close the valve again when you have let out one or two gallons of (very hot!) water.
If your drain valve doesn’t want to open, don’t force it! Rather call a professional with the right tools, rather than risk having scalding water exploding in your face.
Step 2: Valve Testing
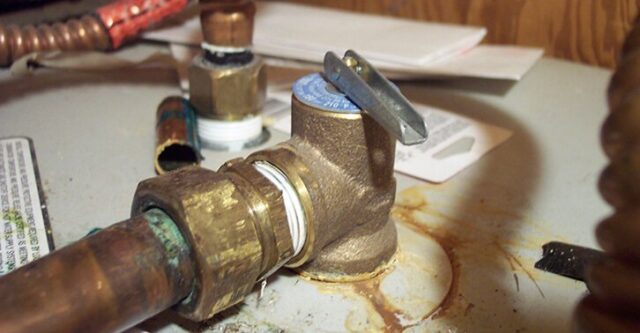
As the temperature of the water increases, it expands, causing more and more pressure to build up inside the water heater tank. When this happens, the temperature and pressure relief (T&P) valve automatically opens to allow the hot air or steam to escape. If your T&P valve is faulty or clogged with grime, that heat has no way out, and you run the risk of a spectacular explosion.
Once you have located your T&P valve (normally at the top or side of the water heater tank, and connected to a discharge tube extending from near the top of the tank, towards the bottom):
- The first thing you need is to place a bucket to catch the water running out of the discharge tube.
- Open the valve manually by lifting the lever. Watch out for hot water streaming into the bucket!
- You can allow the valve to close after a few seconds once you’ve seen that the water is flowing properly. Simply let go of the lever.
If you can’t get the valve open, or if it opens but no water comes out, or if it leaks after you have closed it again, call a professional and get it replaced. Alternatively, there are plenty of handy websites providing nifty step-by-step guides to water heater maintenance, complete with photos of how everything should look at every step.
Step 3: Temperature Settings
Most water heaters come with the temperature preset at 130-140°F – which is unnecessarily high. At those temperatures, your hot water is sure to scald you if you touch it when no cold has been added.
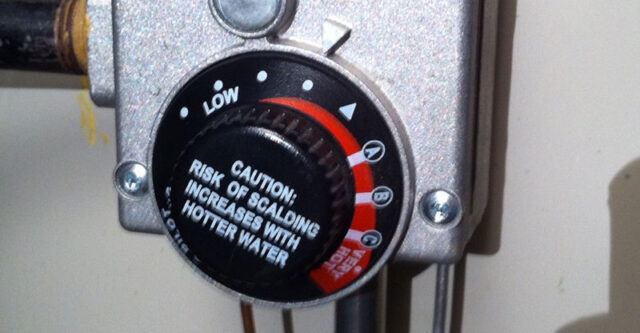
By setting your temperature to 120°F instead, you can reduce your costs by five per cent or even more, as well as reduce the risk of getting a nasty surprise when you touch your hot water. Moreover, using a slightly lower temperature setting is better for your system, because it reduces mineral deposits in your tank and pipeline.
If you have a gas water heater, there should be a temperature dial on the gas valve. Simply adjust it downwards to your preferred temperature.
With electric water heaters, you’ll probably need to remove a small metal panel in order to access the thermostat. To do this:
- Turn off the relevant circuit breaker to shut off the power supply to your water heater (see above, First Things First).
- Open the thermostat access panel (you might need a screwdriver for this) and adjust the temperature setting.
- Replace the thermostat cover and turn on the power.
Note, some water heaters have two thermostats – but in this case, just set both the upper and lower thermostats to the same temperature.
Danger Signs
Even if you check your system and conduct routine maintenance, there’s always a chance something could go wrong out of the blue. Some of the signs that might indicate you have a problem include:
- Reduced heating capacity/no heating capacity (if your hot water suddenly stops getting really hot, you’ll know something is wrong – and if your hot water doesn’t get hot at all, you’ll know something is really really wrong!)
- Hot or cold water leaking out anywhere it shouldn’t
- Water temperature fluctuating significantly
Also, it’s a good idea to have a good look at the system visually, from the outside. You shouldn’t be able to see any rust at all, so if you can, you should call someone who can help. Call asap, because you never know when rusting metal will fail, and you’ll get scalding water everywhere.
Final Word
Regular maintenance of your water heater should save you money in the long run – but even if the system is working efficiently, heating water consumes more energy than almost anything else in the average household. Everybody is becoming aware that solar power will soon be the cheapest form of energy, as well as the most environmentally friendly – so when your water heater can no longer be repaired, maybe your next step should be to investigate using solar panels to heat your water.


