
We’re sure you don’t want to waste money going to a mechanic when you don’t have to, right? Well, we don’t want that either.
Because of it, we’ve decided to help you by providing you with an ultra-simple, final, ultimate guide to changing tail light bulbs so you don’t have to pay a mechanic for a two-minute job.
Sounds good? Let’s get started then!
What Will You Need?
First things first, you will need to gather a few tools before you start:
- A small or medium Phillips head screwdriver;
- A putty knife, small flathead screwdriver, or your fingers (if the lens is not too tight);
- New tail light bulbs (of course!);
- And optionally, gloves.
That’s it!
Getting Started
Now that you have everything you need, it’s time to get started! The first step is finding the right spot to work on your car.
We recommend doing this either in your garage or in a well-lit and level parking spot. Once you have found the perfect spot, turn off your car’s engine and pop open the trunk and do the following.
How To Easily Change Tail Light Bulb?
Don’t be intimidated by changing a tail light bulb. It’s really not that difficult, and it’s a great way to save money. Here’s how to do it in just five steps:
Step One: Get The Right Bulb
First, you’ll need to purchase the correct replacement bulb. Not just anyone will do. You can find this information in your car’s owner’s manual or online.
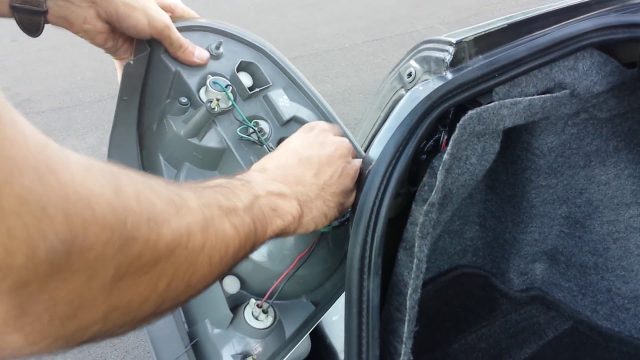
Step Two: Get In From The Back
Next, locate the tail light assembly. This is usually located in the trunk of your car, hidden under a fabric liner. Once you’ve found it, move the plastic/fabric cover to the side to expose the back side of the light and remove the screws or bolts that hold it in place.
Step Two And A Half: Get It From The Front
If you aren’t able to do it from the back, you’ll have to remove the tail lights from the front. This is usually a simple matter of unscrewing a few screws or bolts, removing the lenses, and replacing the bulb like any other.
Step Three: Twist The Bulb Out
Carefully pull the assembly out, trying not to rip any wires, and disconnect the electrical connector. Then, twist the old bulb counterclockwise and pull it out.
Step Four: Put It Back In
Insert the new bulb into the socket and twist it clockwise until it’s tight. Reconnect the electrical connector, and then re-install the assembly the same way you’ve pulled it apart.
Step Five: Enjoy!
Finally, test the new bulb to make sure it’s working. Once you’ve confirmed that it is, you can pour yourself a beer because you’ve done a good job!
Do You Need Professional Help To Do This?
No, not at all.
A job like this requires a few minutes of your time and basic tools everyone has in their household. And, check this out – the only thing that’s mildly time-consuming is visiting Vland and finding the bulb you need.
But at the same time, we get that you’re not a mechanic, and that’s perfectly fine. This guide is designed for those who want to save money by doing it themselves.
But, if you don’t feel comfortable doing it or don’t have the time, you can always take it to a professional. Just know that it’s an easy job that anyone can do with the right tools and a little bit of patience.
How To Replace A Broken Tail Light?
In case you need to do more than just replace a bulb, we’ve got you covered. Here’s a quick guide on how to replace it:
Step One: Find The Right Replacement
The first step is finding the right replacement lens or an entire assembly. Once again, you can find this information in a manual or by just googling it. Since you’re replacing the whole thing – it’ll be super easy to find it.
Step Two: Turn Off The Car Or Disconnect The Battery
The next step is to turn off the car. However, some people don’t find that safe enough, so they disconnect the battery. This prevents any shorts while you’re working on the wiring. So, you might as well do it.
Step Three: Remove The Old One
After the battery is disconnected, you can now remove the old assembly. There are usually a few screws holding it in place. Once you remove those, you should be able to wiggle it out – either from the front or the back.
Step Four: Install The New One
Now that the old one is out, simply put the new one in its place and screw it in. You might want to use some sealant or tape to make sure it’s watertight.
Step Five: Reconnect The Battery And Test It Out!
And that’s it! Just reconnect the battery and test it out. If everything works, you’re good to go. Otherwise, check your connections and make sure everything is plugged in correctly.
We hope this quick guide helped you out. Replacing a broken tail light is easy and shouldn’t take more than a few minutes. So, if you ever find yourself in this situation – now you know what to do!
How To Polish A New Tail Light?

Whether it’s replacing a bulb or a whole fixture, what you’ll want to do next is give your rear lights some new shine.
Here’s how to do it:
Step One: Find The Right Polish
The first step is finding the right polish. You’ll want to find a product that’s specifically designed for car lenses. This will ensure that you don’t damage the surface.
Step Two: Clean The Lens
Start by cleaning the lens with a microfiber cloth and some soapy water. This will remove any dirt or grime that’s on the surface.
Step Three: Apply The Polish
Once the lens is clean, apply a small amount of polish to the surface. You’ll want to use a circular motion and make sure you cover the entire lens.
Step Four: Buff It Out!
After the polish has been applied, buff it out with a clean microfiber cloth. This will remove any excess polish and leave a nice, smooth surface.
And that’s it! Just follow these steps and you’ll have a new, shiny tail light in no time!
Conclusion
That settles it!
We hope this guide has been helpful and that you’ll never have to worry about changing a tail light bulb again. Thanks for reading!
")


